Residential Kitchen Remodeling
Commercial kitchen remodeling in Chula Vista by VexKitch. We specialize in ADA compliant kitchens, restaurant kitchen renovations, and durable code-compliant designs for cafés, breakrooms, and hospitality spaces.
Why Remodel?
Done right, a kitchen remodel doesn’t just look good—it works better, adds value, and meets all local requirements from the start.
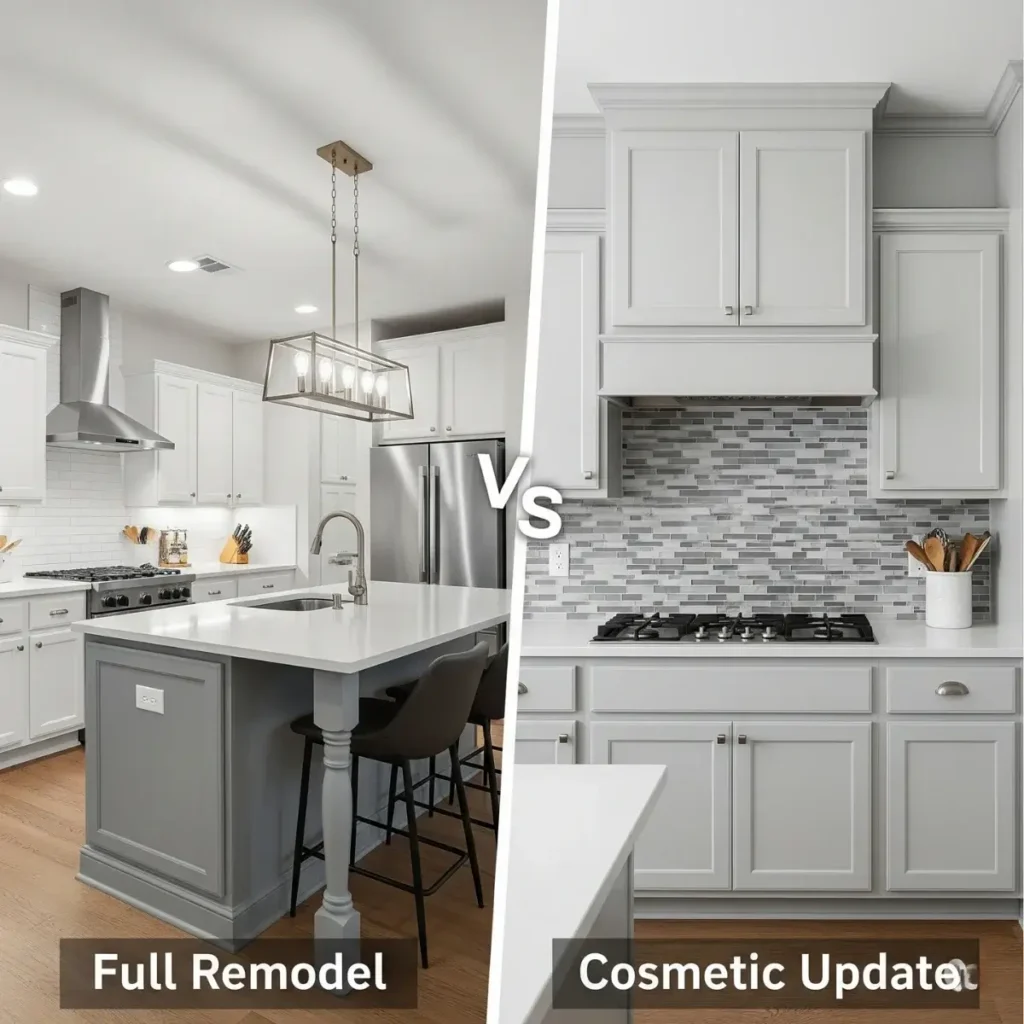
Remodel vs. Cosmetic Updates
- Remodel: Structural changes—walls, plumbing, layout, electrical.
- Cosmetic: Surface updates—paint, backsplash, hardware.
Why Homeowners Remodel
- Functionality: Smarter layout, more storage, better flow.
- Resale Value: Boosts home worth by 5–15%, depending on scope.
- Efficiency: Modern appliances and lighting cut energy costs.
- Style: Brings the space up to date—visually and practically.
Local Compliance: Title 24 in California ✨
Planning structural work? Ensure your kitchen remodel meets California Title 24 codes with these key requirements.
Lighting
Must meet energy-efficiency standards—use high-efficacy LEDs or fluorescents for at least 50% of kitchen wattage. Separate switches for high- and low-efficacy lights are a must!
Outlets & Vents
Electrical updates may require GFCI-protected outlets every 4 feet, while ventilation must ensure proper airflow—check local codes for specifics!
Inspections
Miss a code, and you’ll redo it at your expense—schedule inspections early and hire a pro to ensure compliance with Title 24 standards.
Permits & Planning
Secure permits before starting—non-compliance can lead to fines or delays. Work with a consultant to align your design with Title 24 updates!
Energy Savings
Complying with Title 24 can lower your energy bills with efficient lighting and appliances—invest smart for long-term savings!
Phase 1: Planning & Budgeting
Planning isn’t the most exciting phase, but it’s the backbone of a smooth remodel. Dial it in now, and you’ll save yourself delays, budget creep, and second guesses later.
Before swinging a hammer, smart planning saves time, money, and plenty of stress down the line.
1. Set Goals & Prioritize
Start by mapping out what you want versus what you need. A clear priority list keeps your remodel focused—and your wallet in check.
Need-to-haves:
- Efficient layout
- Adequate storage
- Safe, updated systems
Nice-to-haves:
- Custom finishes
- Built-in beverage station
- Statement lighting
Also consider universal design principles—especially if you’re planning to age in place or accommodate all users. Features like wider walkways, drawer microwaves, and lever handles aren’t just thoughtful—they’re forward-thinking. Look for professionals with NKBA certifications for guidance.
2. Budget Wisely
As a rule of thumb, invest 5–15% of your home’s value into the kitchen. A $600K home? Expect to spend $30K–$90K depending on material choices and scope.
Keep these in mind:
- Add 10–20% as a contingency for surprises—hidden plumbing issues, outdated wiring, or structural quirks often surface mid-project.
- Prioritize ROI-smart features:
- Quartz or stone countertops for durability
- Functional layouts that boost usability
- Quality hardware that outlasts trends
3. Timeline & Checklist
Every remodel follows a rhythm. Get familiar with the typical flow:
Design → Permits → Demolition → Rough-In → Finishes → Final Touches
A checklist helps keep things on track:
- Cabinets & countertops
- Appliances
- Electrical & plumbing permits
- Licensed contractors & subcontractors
And in Chula Vista, don’t ignore local nuances—permit approval can vary with city load, and weather can affect delivery or demo timing.
4. Planning & Budgeting: Timeline & Checklist ✨
Every remodel has a flow—stay on track with this concise guide!
Timeline
Follow this flow: Design → Permits → Demolition → Rough-In → Finishes → Final Touches.
Checklist
- Cabinets & countertops
- Appliances
- Electrical & plumbing permits
- Licensed contractors
Chula Vista Tips
Permit approval can vary with city load, and weather might affect delivery or demo timing—plan ahead!
Design & Layout
Once the goals and budget are locked in, it’s time to shape the heart of your home. A well-designed kitchen isn’t just pretty—it works hard every day.
Good design starts with flow. The work triangle—cooktop, sink, fridge—still holds its ground for efficiency. But today’s kitchens are more than a triangle; they’re multi-zone workhorses.
1. Layout Principles
Break it down by function:
- Prep Zone: Ample counter space, cutting boards, trash access
- Cooking Zone: Range, oven, spice storage, nearby utensils
- Cleaning Zone: Sink, dishwasher, towel storage
- Storage Zone: Pantry, upper cabinets, deep drawers
- Beverage Zone: Coffee machines, wine fridges, bar sinks
Thinking about an island? You’ll need at least 36″ of clearance on all sides—42″–48″ is better if there’s heavy traffic or multiple cooks.
2 .Style & Materials
Cabinets shape your kitchen’s identity and take up the most visual real estate.
- Refacing is cost-effective if the structure’s solid—just swap doors and finish.
- Full replacement allows for layout reworks and custom features like soft-close drawers, pull-out shelves, or appliance garages.
Current design moves lean toward:
- Two-tone cabinetry: Dark base, light uppers
- Natural finishes: Wood grains, matte textures
- Slab backsplashes: Seamless, minimal grout lines
Don’t underestimate hardware. A bold pull or mixed-metal knob can shift the entire vibe. Think brushed gold with matte black, or modern shapes in aged bronze.
Design isn’t just about style, it’s about how the space supports your habits. A kitchen that looks good but functions poorly ends up being a daily frustration. Aim for both form and function, and you’ll enjoy every square foot.
Hiring & Compliance with Vexkitch
Hiring right and building by the book keeps your project above board and future-proof. When in doubt, check with Chula Vista’s local building department, it’s better to ask once than to rebuild twice.
1. Contractor Selection
Don’t just hire the first name on a flyer. Vetting your contractor is just as crucial as picking out your tile.
Here’s a solid game plan from Vexkitch:
- Interview at least 3 licensed contractors
- Confirm they carry general liability insurance and workers’ compensation
- Check references—recent and local jobs speak volumes
- Ask for a detailed written estimate (scope, cost breakdown, timeline)
Dig deeper:
- Will they use in-house crews or subcontractors?
- What’s the general contractor’s on-site involvement?
- How do they handle daily clean-up and noise?
A reliable contractor won’t flinch at these questions, they’ll appreciate that you care about quality.
2. Permits & Compliance
Kitchen remodels often cross into regulated territory. In California, building permits are required if your project includes:
- Electrical work (adding outlets, relocating lighting)
- Plumbing changes (moving sinks, dishwashers)
- Structural changes (removing walls, adjusting framing)
Skipping permits might save time upfront—but you’ll pay for it later during inspections or resale.
Don’t forget California Title 24:
- Requires high-efficacy lighting (like LED)
- Mandates ventilation standards for range hoods
- Impacts electrical loads, insulation, and window efficiency
At Vexkitch, navigating permits and compliance is part of the process—ensuring your Chula Vista kitchen remodel is smooth, legal, and built to last.
Execution: Renovation Phases
Design meets utility. A well-managed execution phase keeps your project on track and ensures the kitchen not only looks right, but works beautifully for years to come.
1. Demolition & Prep
First comes the tear-out. It’s noisy, dusty, and not the time for improvisation.
Prep checklist:
- Shut off utilities (gas, water, power) to affected areas
- Secure permits and inspections before starting
- Arrange waste disposal—a dumpster or haul-away service
- Protect surrounding areas from debris and dust
Living at home during demo? Plan for noise, limited kitchen use, and a temporary setup with essentials (microwave, mini fridge, coffee maker).
2. Structural & Rough‑In
With the space cleared, structural and mechanical updates come next.
This phase covers:
- Wall modifications (removal or reframing)
- Window or door adjustments
- Plumbing reroutes (sink, dishwasher, fridge lines)
- Electrical rough-in (wiring for appliances, lighting, outlets)
All rough work must pass inspections before anything gets sealed up.
3. Cabinets, Counters & Fixtures
Once the bones are ready, it’s time to layer on the features.
Installation order matters:
- Cabinets first—base and wall units set the foundation
- Countertop templating comes next—based on final cabinet placement
- Countertop install—quartz, granite, or marble slabs typically take 1–2 weeks to fabricate
Stone choice matters:
- Marble: Elegant, but prone to etching and staining
- Quartz: Durable, low-maintenance, wide style variety
- Slab backsplash: Clean lines, minimal grout, seamless finish
4. Appliances & Hardware
Final fit-outs bring function and polish.
- Appliance placement should follow exact sizing—panel-ready units need custom cabinet spacing
- Finish work includes:
- Faucets and fixtures
- Drawer pulls and knobs
- Under-cabinet lights, pendants, and dimmers
Finalization & Quality Control
The home stretch, where details make all the difference.
Key Steps to Wrap It Up
- Install backsplash, lighting, and hardware: The finishing touches that bring style and function
- Punch list walkthrough: Walk through every inch to catch any missed details or fixes before sign-off
- Cleaning protocols: Ensure the site is spotless—dust-free counters, polished floors, and no construction debris left behind
- Contractor etiquette: Respectful behavior during final days keeps homeowners comfortable and stress low
Attention to detail now seals the deal. A thorough final check means your new kitchen won’t just look great—it’ll feel complete from day one.
Case Studies & Inspiration
Small touches that make a big impact without the hassle of demolition or heavy construction.
Budget Remodel: Fresh Look for Less
- New cabinet hardware
- Paint refresh on existing cabinets
- Updated backsplash with peel-and-stick tiles
- Swapped out lighting for brighter, energy-efficient fixtures
Result: Modern feel, minimal disruption, budget-friendly upgrade under $5,000.
Full Remodel: Layout and Function Overhaul
- Removed wall for open concept
- Added a large island with seating
- Installed new quartz countertops and slab backsplash
- Updated plumbing and electrical to code
Result: Increased space, better workflow, and a 12% boost in home value, with an investment around $60,000.
TikTok-Style Quick Wins
- Peel-and-stick backsplash for easy style boost
- Swapping pendant lights and under-cabinet LEDs
- Temporary wallpaper or peelable paint accents
Post-Remodel: Maintenance & ROI
Keep the shine alive, and your remodel will pay dividends long after the dust settles.
Care Tips
- Countertops: Wipe spills promptly; avoid harsh cleaners on stone or quartz
- Cabinetry & Hardware: Clean knobs and pulls regularly; lubricate hinges if needed
- Fixtures & Appliances: Schedule routine checks to prevent leaks or malfunctions
ROI Reminder
Kitchens that balance efficient layouts with durable, quality materials tend to deliver the strongest resale returns—often recouping 5–15% of your home’s value. Maintaining your upgrade ensures that boost doesn’t fade with time.
| 📍 Location | 250 3rd Ave, Chula Vista, CA 91910 |
| 📧 Contact | [email protected] |
| 📞 Phone | +1 619 489 1554 |
| 🛠️ Services | Kitchen remodeling, free consultations, eco-friendly practices |